.svg "DELMIC")
.png)


Array tomography (AT) is a technique that enables three-dimensional imaging of large cell and tissue samples. When combined with electron microscopy (EM), AT can provide high-resolution images and 3D reconstructions with ultrastructural details of the sample. EM-AT is often used in the field of connectomics to map individual neurons within large brain volumes [1].
EM-AT has an advantage over other EM techniques, such as serial block-face scanning electron microscopy (SBF-SEM) and focused ion beam scanning electron microscopy (FIB-SEM) in that the sample is not fully destroyed during the imaging process. The sample is cut into sections, and each section can be imaged multiple times, stored, and shared globally [2].
The sample preparation workflow
The sample preparation method for AT involves embedding the sample in resin, trimming the resin block, and sectioning the sample using a diamond-knife ultramicrotome. The ultramicrotome cuts the resin block into either individual serial sections or arrays of sections called ‘ribbons’ on a water surface. The ribbons or individual sections must be aligned and transferred from the water surface to a solid substrate, such as a TEM grid, glass slide, silicon wafer, or scintillator. Finally, the sections can be loaded into an electron microscope.
The aligning and transferring of thousands of sections on a substrate has to be done quickly and with care, since losing only one section means that the volume is not complete anymore. Additionally, the delicate sections are small and thin, so handling them is one of the most complicated and important steps in the array tomography workflow. Since EM-AT is a relatively new technique, there is not yet a standardized approach for this part of the sample preparation workflow. Luckily, researchers have developed various methods to streamline and automate this process. Below, we will provide practical tips and tricks for aligning and loading ribbons onto the solid substrate.
Manual ribbon handling tricks
To obtain long ribbons of ultrathin sections, researchers frequently apply glue to the resin block before sectioning [3]. However, a drawback of using glue is that it contaminates the diamond knife. A paper by Burel et al. describes an alternative approach for obtaining long ribbons of ultrathin sections without the use of glue [2]. They shape the surface of the resin block into a rectangle, with a block length twice the width to minimize the folding and curling of the sections.
The process of aligning and transporting the ribbons from the water bath to a solid support is very important and requires careful handling. In the aforementioned paper, the researchers align the ribbons on the water support using an eyelash attached to a thin stick. Once the ribbons are generated, they slowly drain the water and manually align the sections on the substrate, which is located at the bottom of the water support (Figure 1). This is a commonly used method for transporting the ribbons.
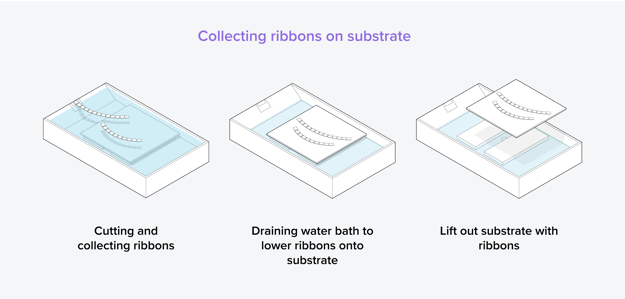
Figure 1: One of the methods to collect ribbons onto the solid substrate. The ribbons are first collected in the water bath with the substrate at the bottom of the bath. Then, the water is drained and the ribbons are lowered onto the substrate. Lastly, the substrate with the ribbons can be lifted out.
To keep the substrate in place during the process, some researchers use a paper clip to immobilize it, exposing only its rim out of the water bath. The sections can then be placed on the rim, which helps to keep them in place during draining.
Another method for picking up a small number of sections involves using a tiny metal loop. The loop is lowered towards the floating sections, pushed slightly into the water, and the sections are lifted out by moving up the loop (Figure 2). On average, the loop can pick up around 7 sections, but this is dependent on the section size.
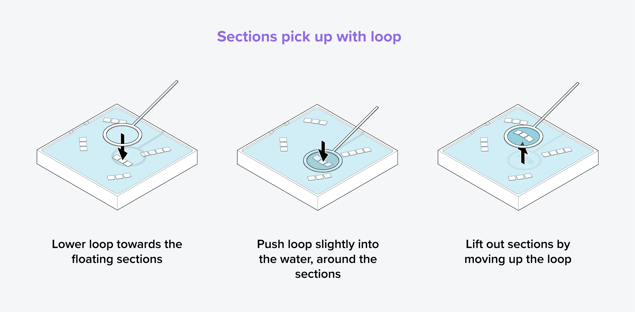
Figure 2: Method to pick up sections using a metal loop. The loop is lowered above the sections and pushed into the water around the sections. Then, the sections are lifted out by moving up the loop.
Researchers have also made an inexpensive crane-like device using a fishing line for collecting ribbons [4]. They were able to mount ribbons with a mean length of around 200 sections onto silicon substrates with this device.
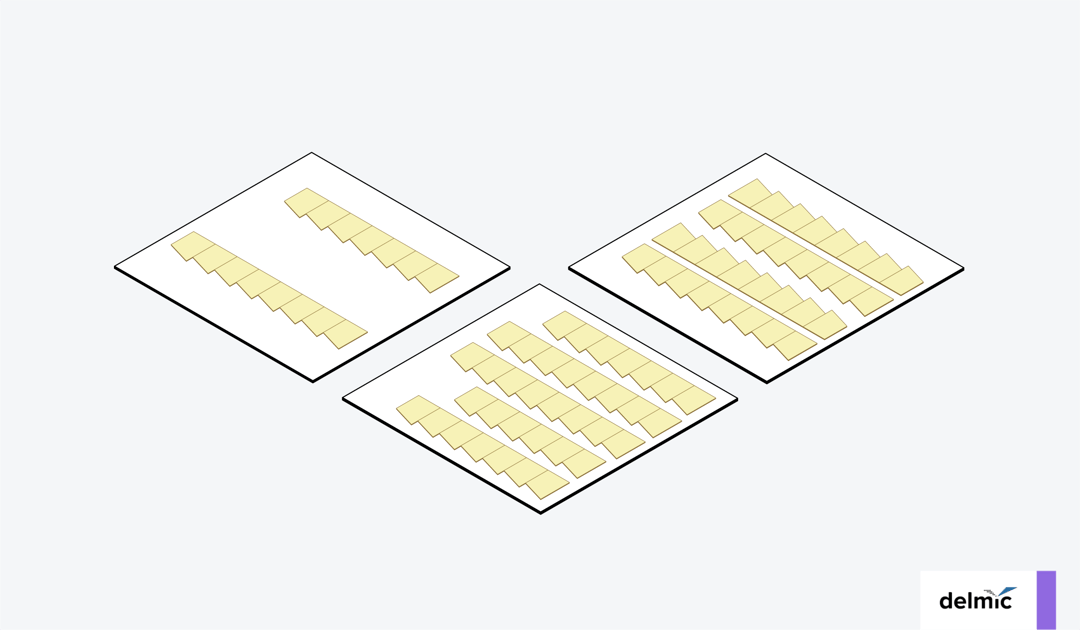
When creating long ribbons for EM-AT, it is crucial to maintain the order of the ribbons. It is therefore recommended to handle ribbons in batches of five for easier handling. Additionally, there are different ways to manage the ribbons when mounting them on a substrate, each with its own advantages. The ribbons can be spaced far apart to avoid sticking together, collected in groups to increase their stability, or arranged in opposite orientations (Figure 3) [5][6]. Placing them in opposite orientations has the advantage of facilitating imaging, as it only requires a small step to move from one section to the other rather than flying back each time a new ribbon is imaged.
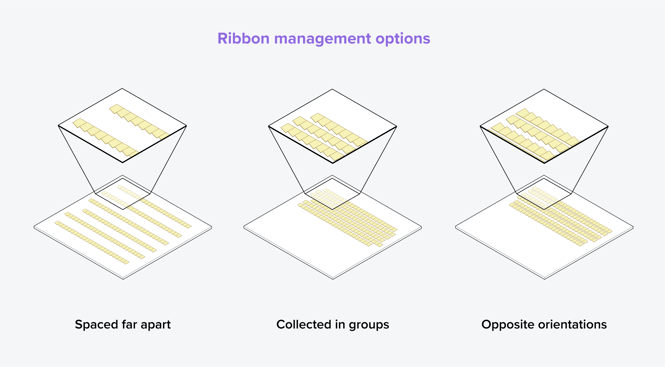
Figure 3: Various methods for collecting ribbons onto a substrate. The ribbons can be spaced far apart to avoid sticking together, collected in groups to increase stability, or collected in opposite orientations to facilitate imaging [5][6].
Here are some additional tips to consider for section handling. Adding Triton X-100 can help to minimize surface tension. Attaching a poly-L-lysine strip to the coverslip can help anchor the first section of the ribbon. If you encounter wrinkled sections, spraying chloroform can help stretch them out. For AT, marking the water bath with a ribbon length gauge can help indicate the maximum ribbon length achievable.
Automated ribbon collection and transport
For samples with very large amounts of ribbons, manually aligning and transferring the ribbons can be quite time-consuming, even when customized tools are available. To address this, several devices have been developed to automate these processes, such as the Arraybot collector for placing ribbons onto glass coverslips [1], AUTOCUTS for collecting ultrathin sections [7], and ARTOS 3D from Leica for quick sectioning and easy ribbon alignment [8]. Additionally, standard manual control micromanipulators can be used to stabilize the section pickup [9]. However, these devices may not be available in all research facilities, so cheaper alternatives and customized tools are still frequently used.
Using tape for ribbon collection
The development of flexible polymer substrates has opened up a new way for researchers to collect and transport the sections using tape. One such example is the carbon-coated Kapton tape, which can be cut and glued onto silicon wafers for SEM imaging [1][10]. Additionally, the array sections can be directly attached to the silicon wafer surfaces. This process can be automated using the commercially available automated tape-collecting ultramicrotome (ATUMtome) [11]. However, the high costs associated with using tape for ribbon collection are a major disadvantage.
There are thus numerous techniques and tricks available for aligning and transferring ribbons and sections in the AT sample preparation workflow. These processes can either be done manually with the help of some tricks or automatically using specialized devices. Choosing either one or the other is highly dependent on the sample type and the research facility. Only the future can tell if the paperclip trick or the specialized devices will prevail in the EM-AT sample preparation workflow.
References
[1] Smith, S.J., BMC Biol 16, 98 (2018)
[2] Burel, A. et al., Development 15, 145, 12 (2018)
[3] Kristina, D. et al., Neuron, 55, 1, 25-36 (2007)
[4] Koike, T et al., ACTA HISTOCHEMICA ET CYTOCHEMICA, 50, 5, 135-140 (2017)
[5] Jemima Burden (UCL) at the EMBL workshop
[6] Ian J. White, Jemima J. Burden, Methods in Cell Biology, Academic Press (2023)
[7] Li, X. et al., Journal of Structural Biology, 200, 2, 87-96 (2017)
[8] ARTOS 3D from Leica
[9] Commercially available Standard Manual Control Micromanipulators
[10] Kubota, Y. et al., Nat Commun 9, 437 (2018)
[11] The ATUMtome